Apple Sign-In 설정 가이드
myapp-backend
개요
Apple Sign-In은 카카오/구글/네이버와 다음 두 가지 측면에서 다르다.
- 웹 로그인은 backend가 OAuth proxy 역할을 해야 한다.
client_secretJWT를.p8private key로 직접 서명해야 하고, Apple은scope=name email인 경우response_mode=form_post를 강제하므로 frontend가 응답을 직접 받을 수 없다. - App ID와 Services ID라는 두 개의 식별자가 필요하다.
- App ID = iOS 앱 Bundle ID (Primary App ID)
- Services ID = 웹 로그인 전용 식별자 (App ID와 다른 이름이어야 함)
이 문서는 Apple Developer Portal 설정부터 환경변수, 트러블슈팅까지 한 번에 끝낼 수 있도록 정리한 가이드다.
한국 개발자 추가 의무 (2026-01-01부터) App ID 등록·변경 시 Server-to-Server Notification Endpoint를 필수 등록. 참고: https://developer.apple.com/news/?id=j9zukcr6
사전 준비
| 항목 | 비고 |
|---|---|
| Apple Developer Program 멤버십 | 개인 $99/년, 법인 $299/년 |
본인 도메인 (예: myapp.com) |
Services ID 등록 시 필요 |
| 로컬 HTTPS 터널 (ngrok 등) | Web flow 로컬 테스트용. localhost는 Apple이 거부 |
.p8 안전한 보관소 (1Password 등) |
Key는 한 번만 다운로드 가능, 분실 시 재발급 불가 |
1. Team ID 확인 — APPLE_TEAM_ID
Membership details에서 Team ID (10자 영숫자) 복사.
APPLE_TEAM_ID=ABCDE123452. App ID 생성 — APPLE_CLIENT_ID
iOS 앱 Bundle ID이자 Sign In with Apple의 Primary App ID 역할.
단계
Identifiers → ➕
App IDs → App 선택 → Continue
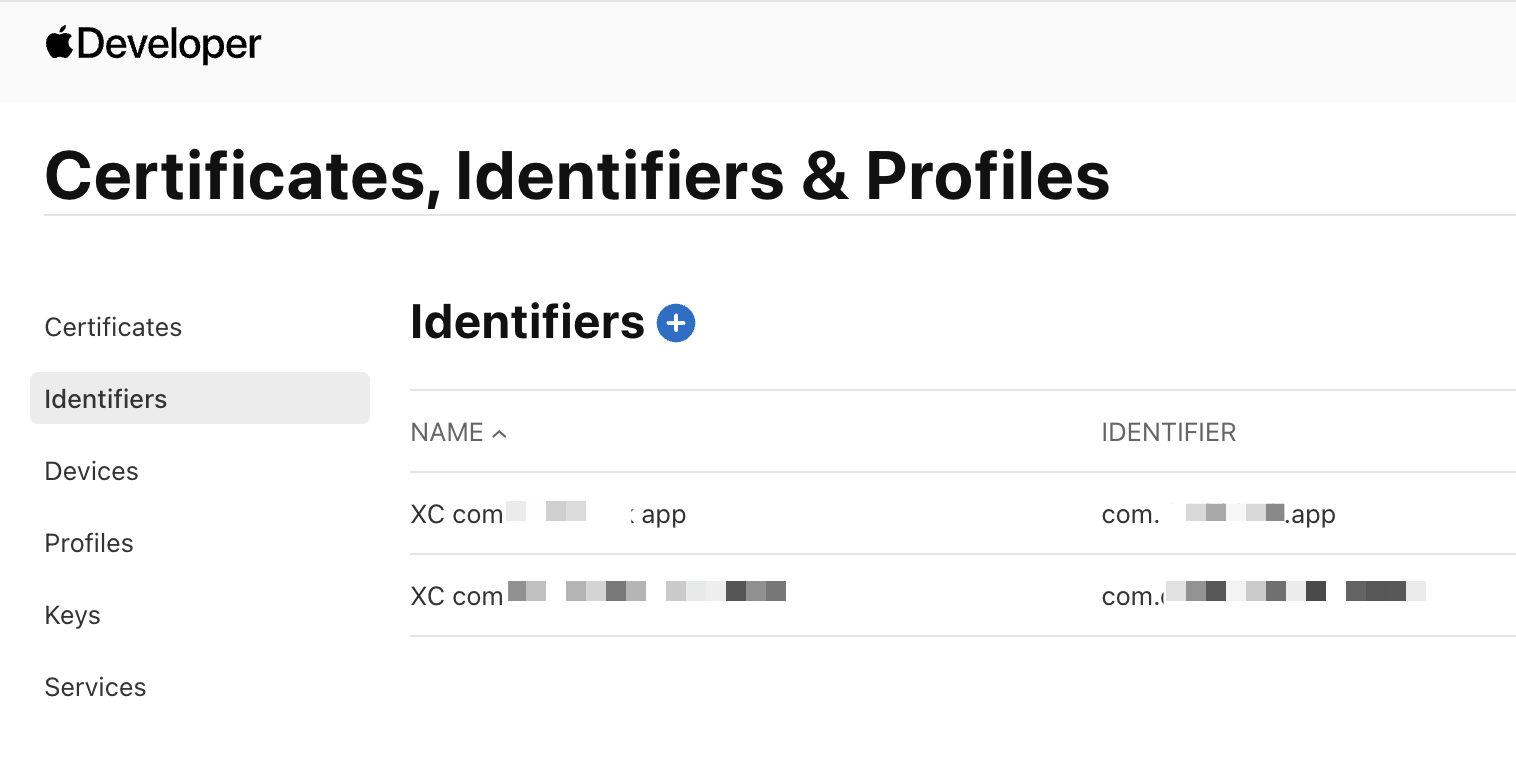
certificates-Identifiers-Profiles.png 입력
- Description:
MyApp iOS App - Bundle ID: Explicit 선택 →
com.myapp.app
- Description:
Capabilities 섹션 → Sign In with Apple ✅
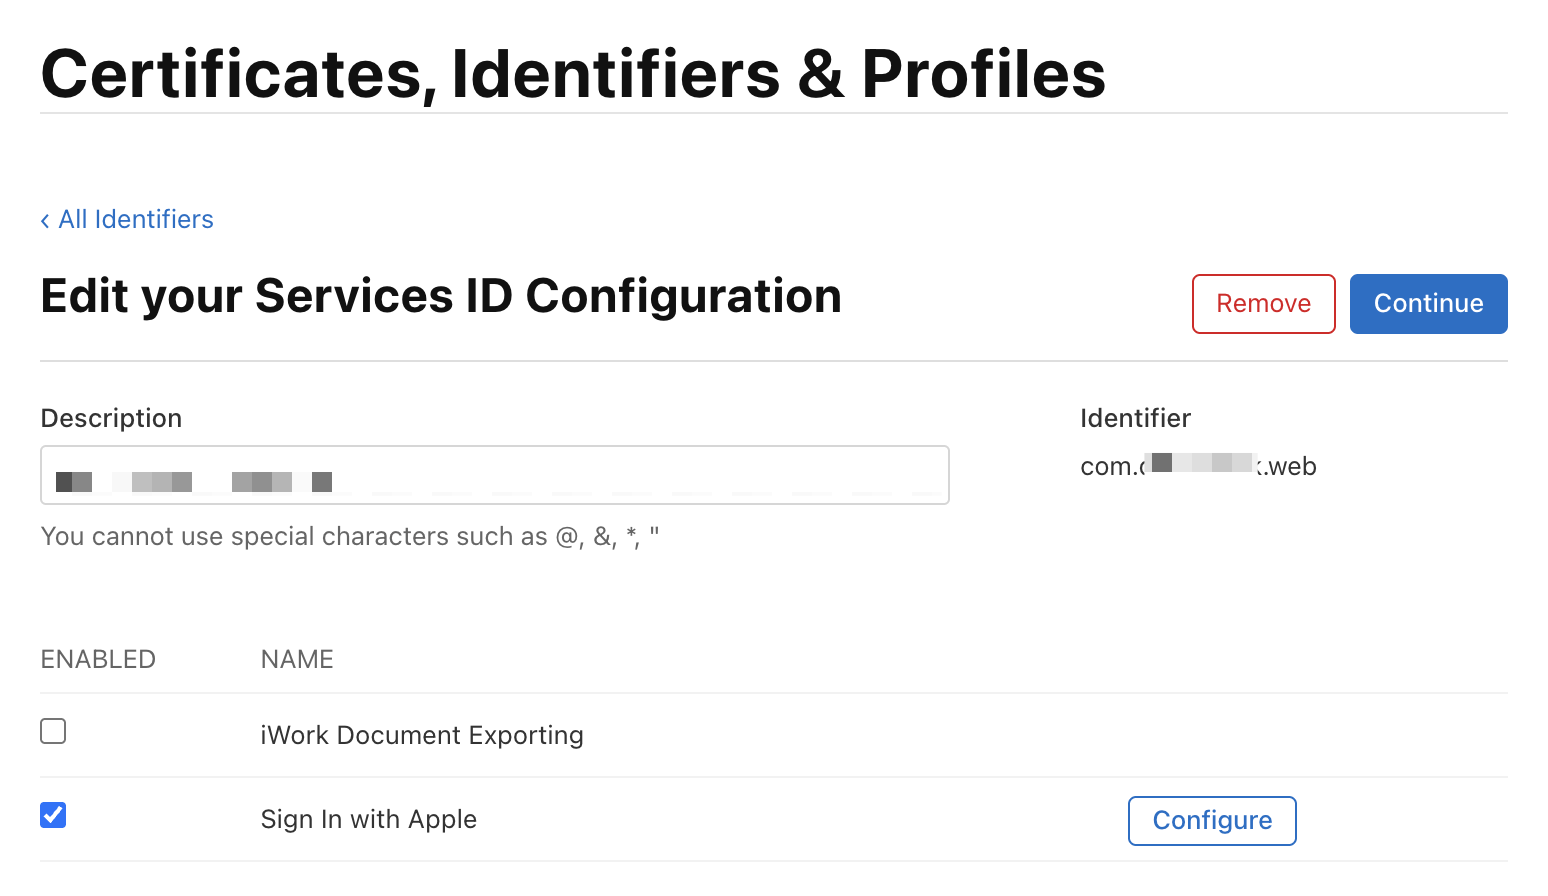
Edit-your-Services-ID-Configuration.png Continue → Register
Sign In with Apple Capability 활성화 (★ 자주 빠뜨리는 단계)
방금 만든 App ID를 다시 클릭 → Sign In with Apple 옆 Edit (또는 Configure):
- ✅ Enable as a primary App ID 선택 (
Group with...이 아님) - Save
- 페이지 우측 상단의 Save 버튼도 별도로 눌러야 적용됨 → 확인 다이얼로그 → Confirm
APPLE_CLIENT_ID=com.myapp.appApp ID와 Services ID는 같은 네임스페이스를 공유한다. App ID로 com.myapp.web을 이미 등록했다면 같은 식별자로 Services ID를 만들 수 없고, 그 반대도 마찬가지.
3. Services ID 생성 — APPLE_SERVICES_ID
웹 로그인 전용. App ID와 다른 식별자여야 함.
단계
- Identifiers → ➕
- Services IDs 선택 → Continue
- 입력
- Description:
MyApp Web Login - Identifier:
com.myapp.web
- Description:
- Continue → Register
Web Authentication Configuration
방금 만든 Services ID 클릭 → Sign In with Apple ✅ → Configure:
이 다이얼로그가 회색으로 비활성화돼 있다면 2단계의 App ID에서 “Enable as a primary App ID”가 체크되지 않은 상태다. App ID 설정으로 돌아가서 Primary 활성화 + Save 후 다시 시도.
다이얼로그 입력:
Primary App ID: 위에서 만든
com.myapp.app선택Domains and Subdomains (호스트명만, scheme/path 없음):
api.myapp.com
delighted-upstroke-settle.ngrok-free.dev
Return URLs (
https://+ 전체 경로):https://api.myapp.com/api/auth/apple/callback/ https://delighted-upstroke-settle.ngrok-free.dev/api/auth/apple/callback/Next → Done → Continue → Save
APPLE_SERVICES_ID=com.myapp.web도메인 소유 검증: production 도메인(api.myapp.com)은 Apple이 apple-developer-domain-association.txt를 /.well-known/ 경로에 호스팅하라고 요구할 수 있다. ngrok 무료 도메인은 ngrok 소유라 보통 검증이 면제된다.
4. Sign In with Apple Key 생성 — APPLE_KEY_ID + APPLE_PRIVATE_KEY
단계
- Keys → ➕
- 입력
- Key Name:
MyApp Sign In with Apple Key - Sign In with Apple ✅ → 우측 Configure
- Key Name:
- Choose a Primary App ID:
com.myapp.app선택 → Save - Continue → Register
⚠️ 발급 직후 화면 (단 한 번만 나타남)
- Key ID (10자) 복사 →
APPLE_KEY_ID - Download 버튼 →
AuthKey_XXXXXXXXXX.p8다운로드 - 1Password 등 안전한 곳에 백업 (재발급 불가)
.p8 → 환경변수 변환
# 줄바꿈을 \n으로 이스케이프해서 한 줄로 변환, 클립보드 복사
awk 'NR==1{printf "%s",$0;next}{printf "\\n%s",$0}END{printf "\\n"}' \
  ~/Downloads/AuthKey_*.p8 | pbcopy

# .env.local 의 APPLE_PRIVATE_KEY="..." 큰따옴표 안에 붙여넣기APPLE_KEY_ID=ABCDEF1234
APPLE_PRIVATE_KEY=<.p8 파일 내용을 \n으로 이스케이프한 한 줄>5. Server-to-Server Notification Endpoint 등록
App ID 쪽에 등록 (Services ID 아님).
단계
App ID(
com.myapp.app) 클릭Sign In with Apple 행의 우측 Edit
Server-to-Server Notification Endpoint 입력:
https://api.myapp.com/api/auth/apple/notifications/Save → Continue → Save
Endpoint 요구사항: HTTPS 필수 / non-200 응답 시 Apple이 재시도. 우리 구현은 어떤 경우에도 200을 반환하므로 OK.
Apple이 보내는 4가지 이벤트
| Type | 발생 시점 | 우리 처리 |
|---|---|---|
email-enabled |
Apple proxy 이메일 수신 재활성화 | User.can_receive_email = True |
email-disabled |
Apple proxy 이메일 수신 비활성화 | User.can_receive_email = False |
consent-revoked |
사용자가 Apple 로그인 연동 해제 | Apple 연동만 unlink + 비활성화 |
account-delete |
Apple ID 자체 삭제 | Apple 연동만 unlink + 비활성화 |
정책: 학원 데이터 보존 차원에서 자동 데이터 삭제는 하지 않음. 사용자가 명시적으로 회원탈퇴 요청 시에만
DeleteAccountView가 데이터 정리.
6. 백엔드 환경변수 (.env.local / Railway)
# 5개 + 1개 = 6개
APPLE_CLIENT_ID=com.myapp.app
APPLE_SERVICES_ID=com.myapp.web
APPLE_TEAM_ID=ABCDE12345
APPLE_KEY_ID=ABCDEF1234
APPLE_PRIVATE_KEY=<.p8 파일 내용, \n으로 이스케이프한 한 줄>
APPLE_CALLBACK_URL=https://delighted-upstroke-settle.ngrok-free.dev/api/auth/apple/callback/
서버 재시작 후 검증:
uv run python src/manage.py runserver
open "http://localhost:8000/api/auth/apple/login/?redirect_uri=http://localhost:5173/auth/apple/callback"
# → Apple authorize 페이지로 302 redirect 되면 성공
부록 A: ngrok 설정 (로컬 HTTPS 터널)
Apple Web flow는 HTTPS public URL이 필수라 http://localhost:8000은 거부된다.
설치 + 인증
brew install ngrok
# 토큰 확인: https://dashboard.ngrok.com/get-started/your-authtoken
ngrok config add-authtoken <YOUR_AUTHTOKEN>
Static Domain (무료 plan에서도 1개 제공)
Domains → + New Domain
무료 plan의 Dev domain은 삭제 불가 (“Dev domains cannot be deleted”). 이름 변경은 Edit으로 가능, 그것도 안 되면 그대로 사용.
터널 시작
# Static Domain으로 8000 포트 노출 (별도 터미널, 켜둔 채로)
ngrok http --domain=delighted-upstroke-settle.ngrok-free.dev 8000

# 인스펙터 (디버깅에 유용)
open http://localhost:4040
Apple Developer Portal에 ngrok 도메인 등록
- Services ID → Web Authentication Configuration:
- Domains:
delighted-upstroke-settle.ngrok-free.dev - Return URLs:
https://delighted-upstroke-settle.ngrok-free.dev/api/auth/apple/callback/
.env.local 갱신
APPLE_CALLBACK_URL=https://delighted-upstroke-settle.ngrok-free.dev/api/auth/apple/callback/부록 B: 트러블슈팅 모음 (자주 묻는 에러)
B-1. No App ID is available (Services ID 설정에서)
원인: App ID에 Sign In with Apple capability가 활성화 안 됐거나 Primary가 아님.
해결: 2. App ID 단계로 돌아가서: 1. Capabilities → Sign In with Apple ✅ 2. Edit → Enable as a primary App ID ✅ 3. App ID 페이지 우측 상단 Save
B-2. An App ID with Identifier 'X' is not available
원인: 식별자가 글로벌 unique. 누군가(혹은 본인이 예전에) 이미 등록했거나, 같은 이름이 Services ID에 이미 있음 (App ID/Services ID는 네임스페이스 공유).
해결: 다른 식별자로:
| 용도 | 권장 |
|---|---|
| App ID | com.myapp.app, com.myapp.ios, com.myapp.signin |
| Services ID | com.myapp.web, com.myapp.signin.web, com.myapp.auth |
B-3. One or more domains are invalid (Web Authentication Configuration)
원인: Domains과 Return URLs 필드를 혼동.
해결:
| 필드 | 형식 | 예시 |
|---|---|---|
| Domains and Subdomains | 호스트명만 | api.myapp.com |
| Return URLs | https:// + 전체 경로 |
https://api.myapp.com/api/auth/apple/callback/ |
http://, localhost, IP 주소는 모두 거부됨.
B-5. 404 Not Found on /api/auth/apple/login/
원인: Backend가 옛 버전이거나 마이그레이션 미적용.
해결:
git pull
uv sync
uv run python src/manage.py migrate accounts
uv run python src/manage.py runserver
B-6. Apple 로그인 마지막에 400 Bad Request (frontend)
POST /api/auth/apple/callback/에 대한 400. 가능성 3가지:
Frontend dev mode 이중 실행 (가장 흔함) React StrictMode / Svelte HMR이 effect를 두 번 호출 → 1차는 200, 2차는 400 (
exchange_code는 1회용). localStorage에 토큰 있으면 사실 로그인은 성공.Frontend가 잘못된 키로 보냄 URL의
?exchange_code=X를 그대로{code: X}로 POST. 정확한 키는exchange_code(다른 OAuth와 다름).exchange_code만료 (2분 TTL) 가능성 낮음.
frontend /auth/apple/callback 라우트 처리 예:
const url = new URL(window.location.href);
const status = url.searchParams.get('status');

if (status === 'error') {
  goto(`/login?error=${url.searchParams.get('message')}`);
} else if (status === 'nickname_required') {
  const tempKey = url.searchParams.get('temp_key');
  goto(`/signup/nickname?provider=apple&temp_key=${tempKey}`);
} else if (status === 'success') {
  const exchangeCode = url.searchParams.get('exchange_code');
  const res = await fetch(`${API_BASE}/api/auth/apple/callback/`, {
    method: 'POST',
    headers: { 'Content-Type': 'application/json' },
    body: JSON.stringify({ exchange_code: exchangeCode }),
  });
  const data = await res.json();
  // data.data.tokens.access / refresh 저장
}B-9. invalid_grant (token 교환 시)
원인: client_secret JWT 서명이 틀림. APPLE_TEAM_ID /APPLE_KEY_ID / APPLE_PRIVATE_KEY 중 하나라도 잘못됨.
해결: 4. Key 다시 발급 + 4개 값 재설정.
B-10. ngrok Dev domain 삭제 안 됨
원인: 무료 plan의 Dev domain은 영구. “Dev domains cannot be deleted”.
해결: - A: Dashboard에서 Edit → 이름만 변경 - B: 그냥 그대로 사용 (어차피 기능은 동일) - C: Bring Your Own (유료, 본인 도메인) — dev-api.myapp.com CNAME 등록
부록 C: 백엔드 구현 요약
자세한 코드는 src/accounts/apple.py, src/accounts/views.py, src/accounts/tasks.py 참고.
Endpoint
| Method & Path | 역할 |
|---|---|
GET /api/auth/apple/login/?redirect_uri=... |
Web flow 시작 → Apple authorize 302 |
POST /api/auth/apple/callback/ |
4가지 진입점 통합 (form_post / native / temp_key / exchange_code) |
POST /api/auth/apple/notifications/ |
Server-to-Server Notification 수신 (항상 200) |
Web flow 시퀀스
[1] frontend → GET  /api/auth/apple/login/?redirect_uri={frontend_url}
                    │
                    └─ 302 → https://appleid.apple.com/auth/authorize?...&state={S}

[2] Apple → POST /api/auth/apple/callback/  (form_post: state, code, id_token, user)
                    ├─ id_token 검증 (없으면 code 교환)
                    ├─ 기존 사용자 → exchange_code 발급 → 302 → {frontend_url}?status=success&exchange_code=X
                    ├─ 신규 사용자 → temp_key 발급 → 302 → {frontend_url}?status=nickname_required&temp_key=X&email=...
                    └─ 에러 → 302 → {frontend_url}?status=error&message=...

[3] frontend → POST /api/auth/apple/callback/  {exchange_code: X}
                    └─ {tokens: {access, refresh}, user, is_new_user: false}

[4] frontend → POST /api/auth/apple/callback/  {temp_key: X, nickname: "..."}
                    └─ 신규 가입 완료 + JWT 발급
iOS 네이티브는 [3] 대신 {identity_token: ...}를 직접 POST.
핵심 보안 가드
redirect_uriallowlist:FRONTEND_URL/ADMIN_CONSOLE_URLprefix만 통과 (open redirect 방지)state: 32바이트 URL-safe 랜덤, 1회 소비 (CSRF + 위조 차단)exchange_code: 32바이트, 2분 TTL, 1회 소비 (URL에 토큰 미노출)jti: Apple Notification 24시간 멱등성 (Apple 재시도 방지)- JWKS 캐싱: Redis 12h, kid 미스 시 자동 강제 갱신 (Apple 키 로테이션 대응)
환경별 설정 위치
| 파일 | 설정 |
|---|---|
src/config/settings/base.py |
모든 Apple 변수 default = "" |
src/config/settings/local.py |
env 로딩 + APPLE_CALLBACK_URL default http://localhost:8000/... |
src/config/settings/prod.py |
env 로딩 + APPLE_CALLBACK_URL default https://api.myapp.com/... |
.env.local |
실제 값 (★ git ignore) |
마이그레이션
uv run python src/manage.py migrate accounts
# Applying accounts.0007_apple_provider_and_email_consent... OK
추가된 변경: - Account.OAuthProvider.APPLE (choice) - Account.can_receive_email (BooleanField, default=True)
부록 D: 명령어 모음 (치트시트)
# ngrok 시작
ngrok http --domain=<your-static-domain>.ngrok-free.dev 8000

# Django 개발 서버
uv run python src/manage.py runserver

# 마이그레이션 적용
uv run python src/manage.py migrate accounts

# Apple 관련 테스트
DATABASE_URL=sqlite:////tmp/test_apple.sqlite3 \
  DJANGO_SETTINGS_MODULE=config.settings.local \
  uv run pytest tests/accounts/test_apple_oauth.py tests/accounts/test_apple_notifications.py --no-cov

# Apple authorize 진입 확인
open "http://localhost:8000/api/auth/apple/login/?redirect_uri=http://localhost:5173/auth/apple/callback"

# .p8 → 환경변수 변환
awk 'NR==1{printf "%s",$0;next}{printf "\\n%s",$0}END{printf "\\n"}' \
  ~/Downloads/AuthKey_*.p8 | pbcopy
참고 링크
- Sign in with Apple Documentation
- Configuring Your Webpage for Sign in with Apple
- Generate and validate tokens
- Enabling Server-to-Server Notifications
- Processing Changes for Sign in with Apple Accounts
- 한국 개발자 대상 공지 (2026-01-01)
- App Store Review Guideline 4.8
- WWDC20 Session 10173: Get the most out of Sign in with Apple